
⬇️Die alte Kunst des Decken/The Ancient Art of Blanket Folding
Brad's Iyengar Yoga Notebook

Wenn Sie Yoga in der Iyengar-Tradition beherrschen möchten, müssen Sie absolut neurotisch werden, wenn es darum geht, wie Ihre Decken gefaltet werden. Es gibt einfach keinen anderen Weg.
Heutzutage werden in den meisten westlichen Yoga-Schulen hauptsächlich zwei Arten von Decken verwendet – Decken aus Baumwolle mit Chemiefaser Anteil, und die Baumwolldecken. Schauen wir uns die
Faltung der am häufigsten gebräuchlichen Decken an, den Baumwolldecken.
Jeder Deckentyp hat seine eigene Aufbewahrungsfalte und es ist wichtig zu lernen, wie man die Decke in die Aufbewahrungsfalte faltet.
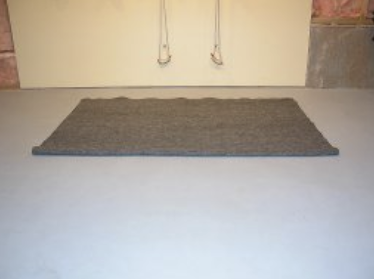
Die Aufbewahrungsfalte verdankt ihren Namen der Tatsache, dass wir die Decken nach dem Gebrauch auf diese Weise gefaltet aufbewahren
(wie auf dem Foto oben auf dieser Seite).
Die Aufbewahrungsfalte ist das „Tadasana der Decke“. Wenn Sie eine Decke aus dem Lagerstapel nehmen und sie richtig verstaut haben, liegt sie in der Lagerfalte. Leider gibt es bei jedem Deckentyp
mehrere Möglichkeiten, die Aufbewahrungsfalte zu legen, die nicht ganz korrekt sind.
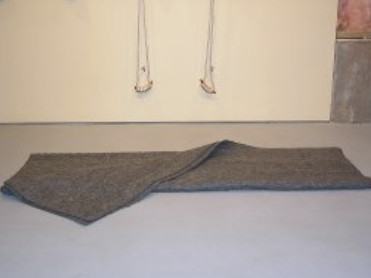
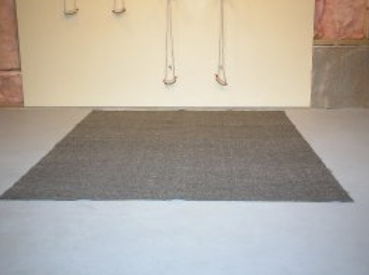
Um die Aufbewahrungsfalte für eine Baumwolldecke herzustellen, beginnen Sie damit, dass sie vollständig auseinandergefaltet ist. Eine Seite ist länger als die andere (auf den Fotos unten nicht
gut zu sehen).
Auf dem Foto mit der vollständig geöffneten Decke unten links sind die linke und rechte Seite die langen Seiten. Falten Sie die Decke zunächst in der Mitte (verbinden Sie dabei die beiden kurzen Seiten).

Achten Sie beim Falten Ihrer Decken darauf, dass Sie die Seiten gleichmäßig anpassen und alle Falten und Wülste in der Decke verteilen.
Das ist Teil der Neurose, erweist sich aber am Ende als sehr wichtig.
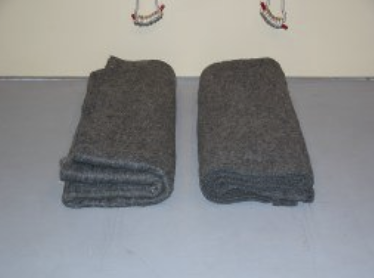
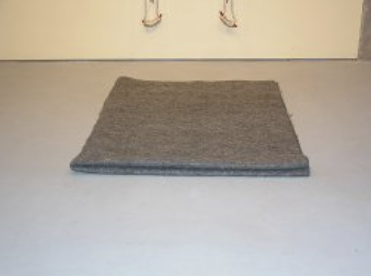
Als Nächstes falten Sie die Decke erneut in zwei Hälften und verbinden dabei erneut die beiden kurzen Seiten.


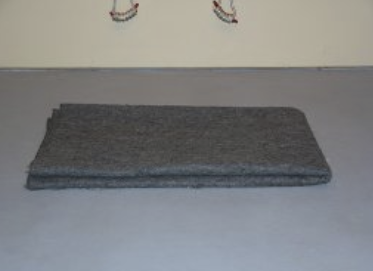
Zum Schluss falten Sie die Decke ein Drittel in der Mitte und verbinden die beiden kurzen Seiten erneut wie unten gezeigt.
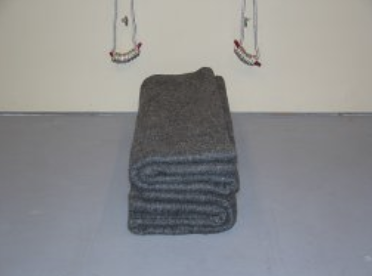
Mit diesen drei einfachen Faltungen erhalten Sie die Aufbewahrungsfalte. (Foto rechts unten).


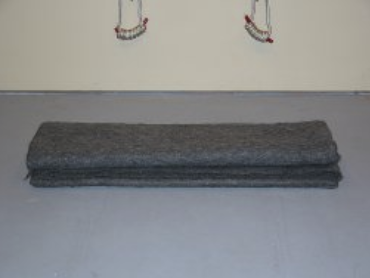
Beachten Sie, dass die Aufbewahrungsfalte ein langes und ein kurzes Maß hat und, was am wichtigsten ist, eine „saubere“ Seite (wo die Deckenfalte abgerundet ist) und eine „lose“ Seite (wo die Kanten der Decke verbunden sind) hat.
Auf den Fotos unten befindet sich die saubere Seite vorne links und wenn man die Decke um 180 Grad dreht, befindet sich die lose Seite vorne rechts.
Die Unterscheidung zwischen der sauberen und der losen Seite Ihrer Decken ist entscheidend für die richtige Anwendung bei den Asanas.


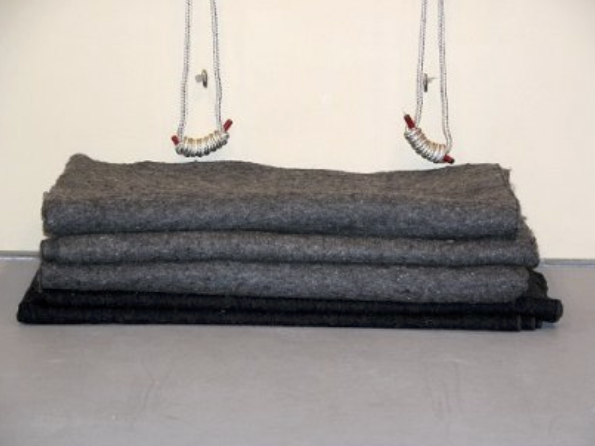
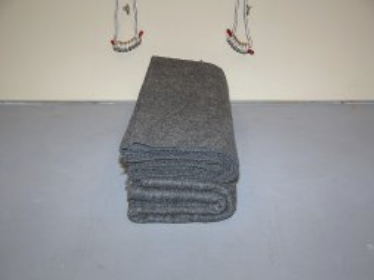
Werfen Sie nun einen Blick auf die ordentlich gefaltete Decke unten.
Sie sieht so schön gefaltet in der Aufbewahrungsfalte aus. Sie hat die gleiche Breite und Länge wie die Aufbewahrungsfalte und liegt auf die gleiche Art und Weise auf dem Aufbewahrungsstapel.
Wenn man sie von oben auf den Aufbewahrungsstapel nimmt, könnte man denken, dass sie sich in der Aufbewahrungsfalte befindet, und tatsächlich werden Decken in Yogaschulen häufig willkürlich auf diese Weise gefaltet.

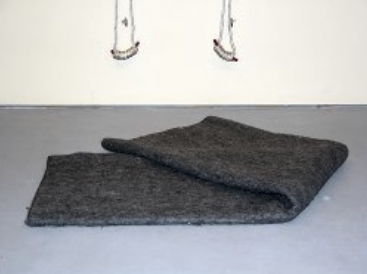
Aber schieben Sie die obere Falte der Decke nur ein wenig nach hinten und Sie sehen, dass es sich hier überhaupt nicht um die Aufbewahrungsfalte handelt. Und wenn Sie sie weiter auseinanderfalten, werden Sie sehen, wie schlecht sie zunächst gefaltet war.
Die erste Falte war korrekt ausgeführt worden, aber die beiden folgenden Faltungen waren in Längsrichtung und nicht in Breitenrichtung ausgeführt worden.
Das mag trivial erscheinen, aber wenn es noch nicht klar ist, wäre die obige pseudo-aufbewahrungsgefaltete Decke weitaus instabiler als eine Decke in der richtigen Aufbewahrungsfalte gewesen, um
sie beispielsweise in Sarvangasana als Stütze zu verwenden.
Gehen Sie also zurück und machen Sie sich klar, wie Sie die Baumwolldecken in ihre Aufbewahrungsfalte falten.
Es ist einfach – drei Falten in der Breite – aber leicht zu verwechseln; und wenn Sie Kurse in einer Yogaschule besuchen, werden Sie sicherlich viele Decken finden, die falsch gefaltet im Stapel liegen.
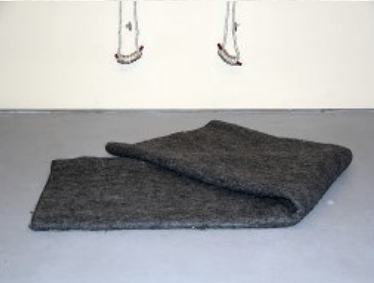
Eine Faltung, die wir oft aus der Aufbewahrungsfalte machen, besteht darin, die Decke diesmal der Länge nach in zwei Hälften zu falten, um eine Art Kissenform zu erhalten.

Offensichtlich hat auch diese Falte eine „saubere“ Kante (vorne links unten) und, wenn man die Decke um 180 Grad dreht, eine „lose“ Kante
(vorne rechts unten).


Wenn Sie diese Falte von den kurzen Enden aus betrachten, werden Sie auch sehen, dass sie saubere und unsaubere Seiten haben
(links bzw. rechts unten).


Auf dem Foto unten sind zwei Decken in dieser Kissenfaltung zu sehen.
Bei der Decke links ist die schmale Seite vorne und die lange Seite zeigt zur Mitte.
Bei der Decke rechts zeigt die saubere, kurze Seite nach hinten zur Wand und die saubere, lange Seite zeigt wiederum zur Mitte.
Es ist wichtig, diese Unterschiede zu beachten, denn wenn Sie eine Decke auf diese Weise falten, werden Sie feststellen, dass die saubere Längskante etwas höher ist als die lose Längskante und die saubere Kante einen viel festeren und stabileren Halt bietet.
Gleiches gilt für die kurzen Kanten hinsichtlich Höhe, Festigkeit und Stabilität.
Nehmen wir also an, wir stapeln zum Spaß zwei Decken, die auf diese Weise gefaltet sind.
Es gäbe verschiedene Möglichkeiten, sie zu stapeln.
Am wichtigsten ist, dass Sie die Decken so stapeln können, dass beide sauberen, langen Kanten auf einer Seite liegen (siehe das linke Foto unten), oder Sie können sie so stapeln, dass die sauberen Seiten auf abwechselnden Seiten des Stapels liegen (siehe rechtes Foto unten).
Beachten Sie auch, dass auf dem linken Foto die sauberen, kurzen Enden auf abwechselnden Seiten des Stapels platziert wurden, während auf dem rechten Foto die sauberen, kurzen Enden zusammengefügt wurden und nach vorne zeigen:

Keine dieser Stapelpermutationen ist „richtig“ oder „falsch“. Sie sind alle für unterschiedliche Zwecke nützlich.
Der beste Weg, um zu veranschaulichen, warum Kenntnisse über das Falten der Decken nützlich sind, besteht darin, zu zeigen, wie die Decken zur Unterstützung verschiedener Asanas verwendet werden.
The Ancient Art of Blanket Folding
Brad's Iyengar Yoga Notebook
If you want to become proficient in yoga in the Iyengar tradition, you must become absolutely neurotic about how your blankets are folded.
There is simply no other way.
There are two main types of blankets in use in most Western yoga schools today -- the brown wool, "army-type" blankets that shed like English sheep dogs, and the Mexican blankets, also called "the cotton blankets" despite the fact they consist of 50% acrylic, 40% polyester, and 10% cotton.
Let's look at the folding of each type of blanket starting with the wool blankets.
Each type of blanket has its own storage fold, it's important to learn how to fold the blanket into the storage fold.
The storage fold gets its name from the fact that we store the blankets after we use them folded in this way (as in the photograph at the top of this page). The storage fold is the "Tadasana of the blanket."
When you take a blanket out of the storage pile, if it has been put away properly, it will be in the storage fold.
Unfortunately, with each type of blanket, there are several ways to mimic the storage fold that aren't quite correct.
To make the storage fold for a wool blanket, begin with it unfolded completely.
One side is longer than the other (not shown well in the photos below). In the fully-opened photo below, the left and right sides are the long sides.
First fold the blanket in half (joining the two short sides):

Take care when folding your blankets that you match the sides evenly and spread out all the wrinkles and rolls in the blanket.
That's part of the neurosis, but turns out to be very important in the end.
Next fold the blanket in half again, once again joining the two short sides:

Finally, fold the blanket in half a third time, again joining the two short sides as below.
With those three simple folds, you have the storage fold (photo on right below):


Note than the storage fold has a long dimension and a short dimension and, most importantly, a "neat" side (where the blanket fold is rounded) and a "loose" side (where the edges of the blanket are joined).
In the photos below, the neat side is in the front on the left and, turning the blanket around 180 degrees, the loose side is in the front on the right. Distinguishing between the neat and loose sides of your blankets is crucial, as will become clear when we talk about how we use the blankets for support in asanas later on.


Now take a look at the neatly folded blanket below.
It looks to be so nicely folded in the storage fold. It has the same width and length as the storage fold, and sits on the storage pile in much the same way. If you took it off the top of the storage pile, you might think it is in the storage fold, and in fact blankets are commonly haphazardly folded this way in yoga schools:

But push the top fold of the blanket back just a little and you see this is not the storage fold at all:


And if you continue to unfold it, you will see how it was perniciously folded to start with:


The first fold had been made correctly, but then the subsequent two folds had been made length-wise rather than width-wise.
This may seem trivial, but if it is not clear already, the pseudo-storage-folded blanket above would have been far more unstable to use for support in, for instance, Sarvangasana, than a blanket in the correct storage fold.
This will become more clear when we talk about how we use the blankets for support in asanas later on.
So go back and be clear about how to fold the wool blankets into their storage fold.
It's simple -- three folds made width-wise -- but easy to mistake; and if you attend classes at a yoga school, you will certainly find many blankets that are folded improperly lying in the storage pile.
One fold we often make from the storage fold is to fold the blanket in half this time length-wise to make a bolster sort of shape:

Obviously, this fold also has a "neat" edge (in the front on the left below) and, turning the blanket around 180 degrees, a "loose" edge (in the front on the right below):

If you view this fold from the short ends, you will also see they have neat and loose sides, left and right respectively below:


In the photo below, there are two blankets in this bolster-type of fold.
In the blanket on the left, the neat, short side is in front and the neat, long side faces toward the middle.
In the blanket on the right, the neat, short side is in the back toward the wall, and the neat, long side is again facing toward the middle.
Observing these differences is important because, if you will fold a blanket this way, you will see that the neat long edge is a bit taller than the loose long edge and the neat edge provides much firmer, more stable support, if you sit on that edge for instance.
The same is true of the short edges regarding height, firmness, and stability.

So, suppose for giggles we stack two blankets folded in this bolster-manner.
There would be several different ways of stacking them.
Most importantly, you could stack the blankets so both of the neat, long edges were on one side (shown in the left photo below), or you could stack them so that the neat sides were on alternate sides of the stack (shown in the right photo below).
Note also in the left photo, the neat, short ends have been placed on alternate sides of the stack, whereas in the right photo, the neat, short ends have been put together and face the front:

None of these permutations of stacking are "correct" or "incorrect."
They are all useful for different purposes.
The best way to illustrate why knowledge of the ways of folding the blankets is useful is to show how the blankets are used to support different asanas.
(The remainder of this page is under construction.
Thanks for your patience.)